Basic liquidity functions
Liquidity is essential for a project to thrive. The goal of this guide is to help you carry out the operations of creating, depositing, and withdrawing liquidity in the pools that interest you most, turning you into an LP provider. In other words, here you can provide liquidity to project pools, allowing you to earn a return (APR) from these pools. You provide this liquidity by generating an LP, which is nothing more than the combination of two tokens into a token pair.
To enhance your experience, we’ve divided the guide so it can adapt to your needs without being too extensive. This way, you can decide whether you want to view the guide in its mobile or PC version, and also whether you’re using Metamask or HumanWallet.
Which device do you want to use?
Basic liquidity functions on mobile devices
First of all, let’s review the different parts included in this section:
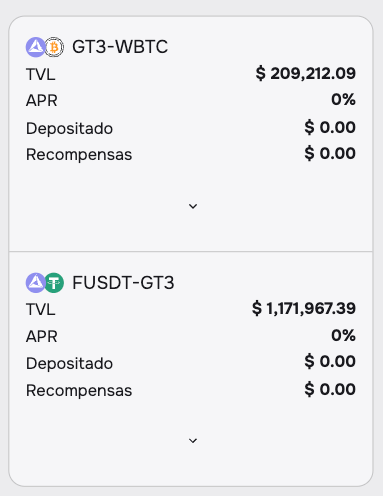
We’ll be able to see a summary of the different pools, including data such as their TVL, APR, what we’ve deposited, and the rewards we’ve earned in that pool. For now, since we haven’t deposited anything yet, both of these values will appear as 0. We need to click on the arrow under each pool to expand it and view the rest of the details.
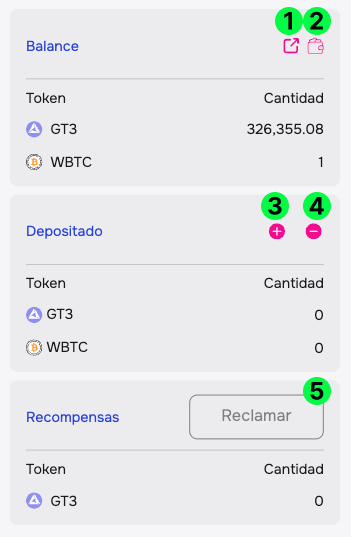
As you can see in the image, the marked points are:
- Contract Link (1) — If you’re a more advanced user and are interested in viewing the contract, this is where you can access its link.
- Add to Wallet (2) — Only visible for conventional Web3 wallets; HumanWallet already includes this in the “Wallet” section. If you want to add the LP to your wallet to track your LP amount from there, you can do it here. On every part of the website where you might need that LP we’ll display a small balance indicator, so adding it isn’t strictly necessary. We also recommend not just holding onto your LP, since you can make much better use of it by depositing it into pools.
- Add and Remove Liquidity (3 & 4) — These two buttons take you to the pool details page, giving you the option to add or remove liquidity, respectively.
- Claim Button (5) — If you only want to claim the rewards from a single pool, you can do so using this button.
After reviewing what can be done in this section, click on the “Add Liquidity” button (number 3) to continue. Once you’re on the pool details screen, select which type of wallet you’re using — see Creating and managing liquidity in pools below.
Basic liquidity functions on PC
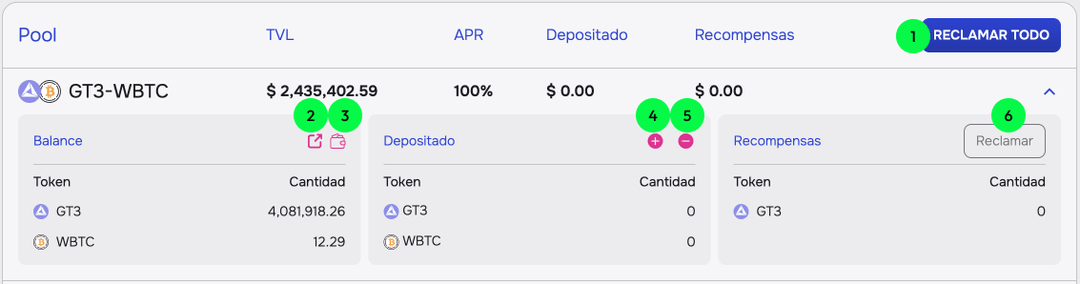
As you can see in the image, the marked points are:
- CLAIM ALL Button (1) — If you’ve already provided liquidity, you’ll see rewards accumulating in the “Rewards” column from the pools you’ve participated in. For greater convenience — so you don’t have to expand the table or claim from each pool individually — you can claim all rewards with a single click.
- Contract Link (2) — If you’re a more advanced user and interested in viewing the contract, this is where you can access its link.
- Add to Wallet (3) — Only visible for conventional Web3 wallets; HumanWallet already includes this in the “Wallet” section. If you’d like to add the LP to your wallet to track how much LP you have, you can do so here. On every part of the website where that LP is required we’ll display your balance in a small indicator, so it’s not strictly necessary. We also recommend not just holding onto the LP, as you can get more value from it by depositing it into the pools.
- Add and Withdraw Liquidity (4 & 5) — These two buttons take you to the pool details page, where you can add or withdraw liquidity, respectively.
- Claim Button (6) — If you only want to claim rewards from a single pool, you can do so with this button.
After reviewing what you can do in this section, click the “Add Liquidity” button (number 4) to continue.
Creating and managing liquidity in pools
Once on the pool detail screen, select the type of wallet you use. We’ve introduced some UX/UI improvements for HumanWallet users that enable transaction chaining, significantly reducing the number of actions and clicks required to create and deposit liquidity.
Which type of wallet do you use?
Creating and managing liquidity in pools with HumanWallet
Add Liquidity
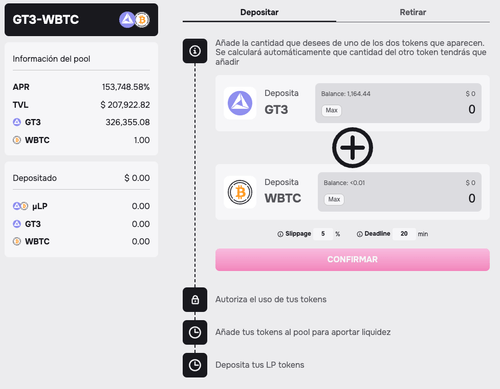
Once we’ve clicked on the previously mentioned “Add Liquidity” button, we’ll arrive at the following pool detail screen.
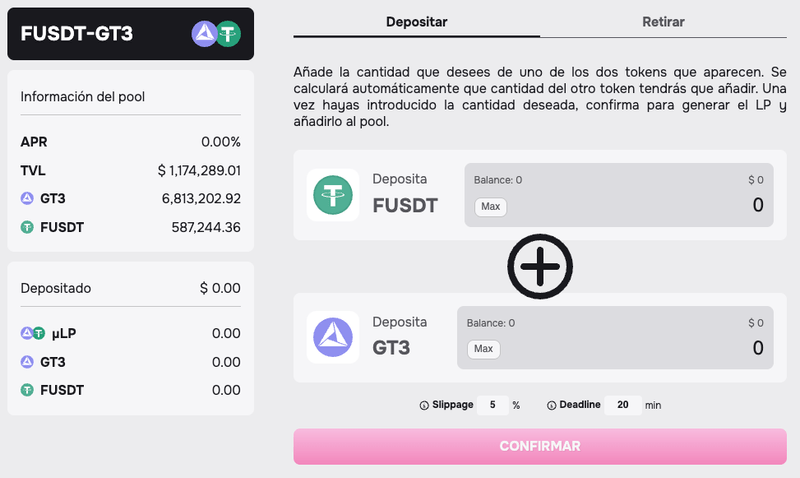
On this screen, in the section on the left, we can see all the pool’s details, such as its balance, APR, and TVL. For now, as long as we haven’t deposited any liquidity, we won’t see additional data here.
In the section on the right, we’ll first see a tab to switch between Deposit and Withdraw liquidity. Below that, you can add liquidity by following the steps displayed on the screen. The most important thing to keep in mind is that you need to enter the desired amount of one of the two tokens, and the other will be calculated automatically.
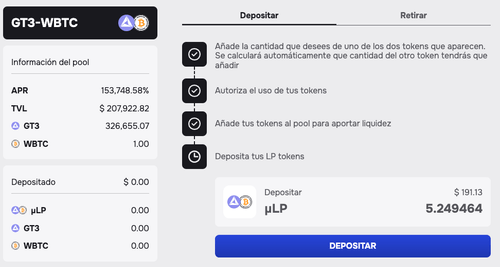
Once you’ve defined the tokens and amounts you want to add, click the “CONFIRM” button, and your LP will be created and added to the pool.
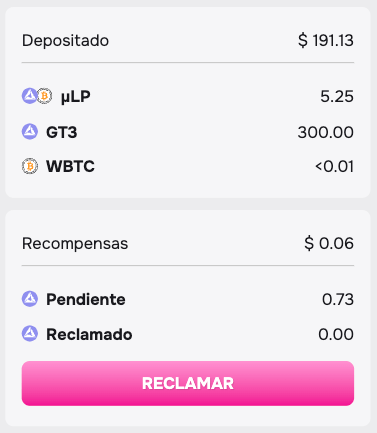
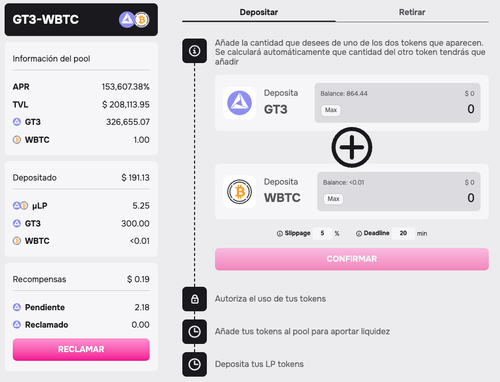
Now we can see what we’ve deposited in the section on the left, and we also have a rewards section where we can claim them. As we’ve noted, this information is summarized on the main liquidity page, where we also have the option to claim from all pools at once.
Withdraw Liquidity
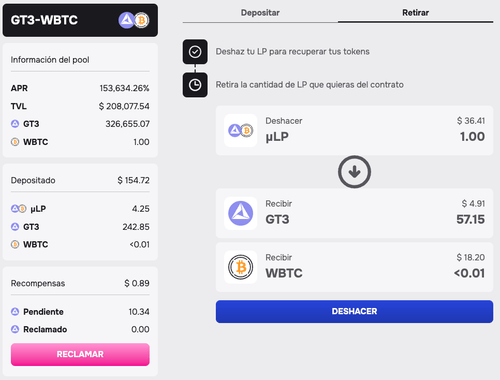
To withdraw liquidity, click on the Withdraw Liquidity button (the one with the ”-” symbol) on the main liquidity page, or go to the Withdraw tab on the pool detail page.
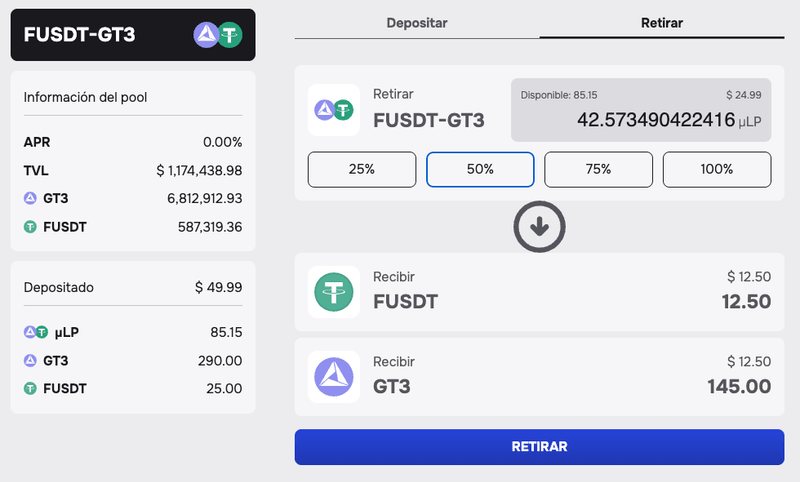
As shown in the image, when using HumanWallet you’ll first see the LP tokens you hold in the contract along with their equivalent value in dollars. From here you can decide how much you want to withdraw, with a breakdown below showing the tokens you’ll receive when the LP is dissolved. With just a single click, you can complete both actions seamlessly.
Once you’ve completed these steps, you’ll see the two tokens you’ve recovered in the “Wallet” section.
Creating and managing liquidity in pools with Metamask
Add Liquidity
Once we’ve clicked on the previously mentioned “Add Liquidity” button, we’ll arrive at the following pool detail screen:
On this screen, in the section on the left, we can see all the details of the pool, such as its balance, APR, and TVL. For now, as long as we haven’t deposited any liquidity, no additional data will appear here.
In the section on the right, we’ll first see a tab to switch between Deposit and Withdraw liquidity. Below that, you can add liquidity by following the steps on screen. The most important thing to remember is that you’ll need to enter the amount you want for one of the two tokens, and the other will be calculated automatically.
Once you’ve defined the tokens and their amounts, there are several actions to complete:
- Confirm the amount you want to deposit.
- Authorize those amounts so the contract can interact with the tokens in your wallet.
- Combine the tokens to generate the LP.
- Deposit the LP into the liquidity pool.
As we complete these actions, we will see each step being confirmed one by one.
Once you’ve deposited the token pair, you’ll see the following screen:
Now we can see what we’ve deposited in the section on the left, and there’s also a rewards section where we can claim them. As mentioned earlier, this information is summarized on the main liquidity page, where you also have the option to claim all rewards from all pools at once.
Withdraw Liquidity
To withdraw liquidity, click on the “Withdraw Liquidity” button (the one with the ”-” symbol) on the main liquidity page, or switch to the Withdraw tab in the pool detail section.
Once you reach this point, the process consists of two parts:
- Withdraw the LP tokens from the pool contract, specifying the amount you want to extract.
- Dismantle the LP, allowing you to recover your original tokens.

You’ll notice that the two steps are the same as shown in the previous image. Once you’ve completed these steps, you’ll see the two tokens you’ve recovered in the “Wallet” section.